Application-specific remote visualization#
VisIt remote rendering on local client#
In VisIt, it is possible to configure a local client to automatically sumbit job on Liger instead of using the remote visualiser. This method can be quite convenient: the application will maintain its menus reactivity and graphics quality as a normal desktop program, while all the heavy image processing will be done in Liger. It can also result quite fast since only processed data (rather than the entire window) is passed from Liger to the client.
The configuration steps will refer to VisIt 3.1.4 - latest available version as of 12/07/2021
Install VisIt 3.1.4 on your local machine#
Client and server versions need to be same for compatibility issues. If you want to use a different version, make sure there is one corresponding on Liger.
Install VisIt 3.1.4 from the official website - download and follow the instructions for your computers' OS: https://visit-dav.github.io/visit-website/releases-as-tables/
More instructions on this page: https://visit-sphinx-github-user-manual.readthedocs.io/en/develop/gui_manual/Intro/Installing_VisIt.html
Add default 'module load' for VisIt#
VisIt comes with a set of dependecies on Liger that can be loaded via the module command. In order to be able to resolve these dependencies when using the remote rendering from a local client, it is necessary to load the VisIt 3.1.4 module during the client-server connection. To do so, we can add the visit module to the default bash environment.
- ssh to liger
ssh <username>@liger.ec-nantes.fr
- Append the following line at the end of the
.bashrcfile in your $HOME folder.
module load visit/3.1.4
You can use nano, vi or emacs editors
Configure the client#
Open the VisIt client on your machine. For Linux, using default installation path, you can run:
/usr/local/visit/bin/visit
A VisIt GUI should be opened. If not, check your VisIt local installation.
Navigate to Options - Host Profiles. Then click on the New Host button and copy the following configuration settings (Important: change the path to /XF/Visit/3.1.4/Installation2 for XDMF support). Change username with you Liger login.
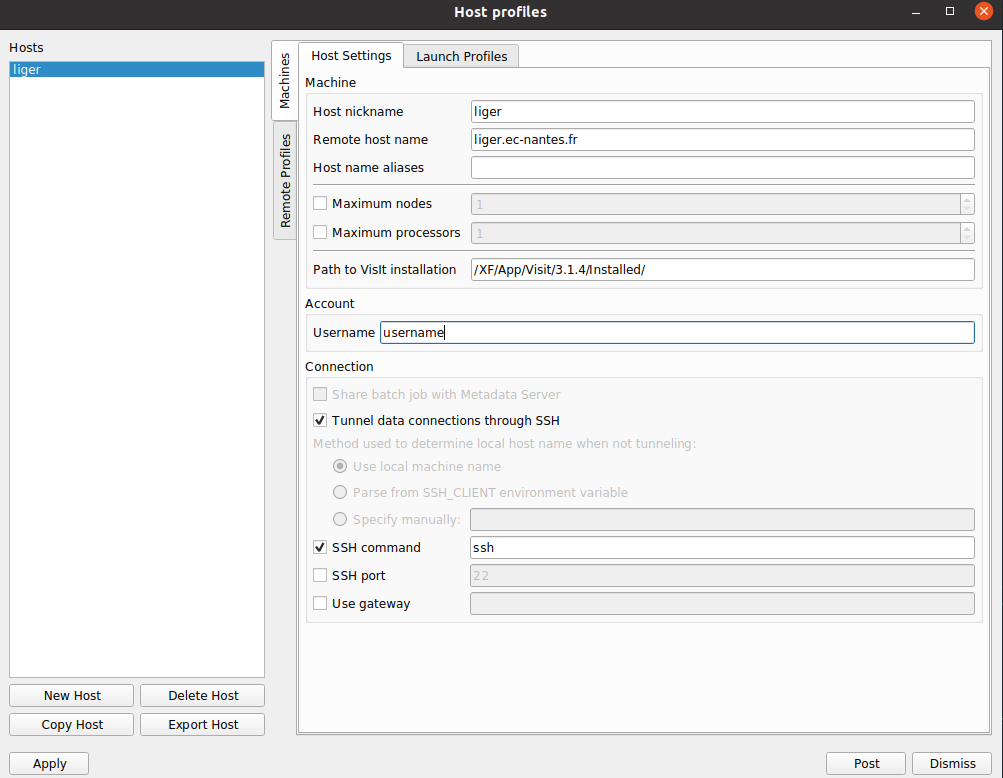
Once the SSH connection details are set, switch to the 'Launch Profiles' tab and create a New Profile with the folllowing settings:
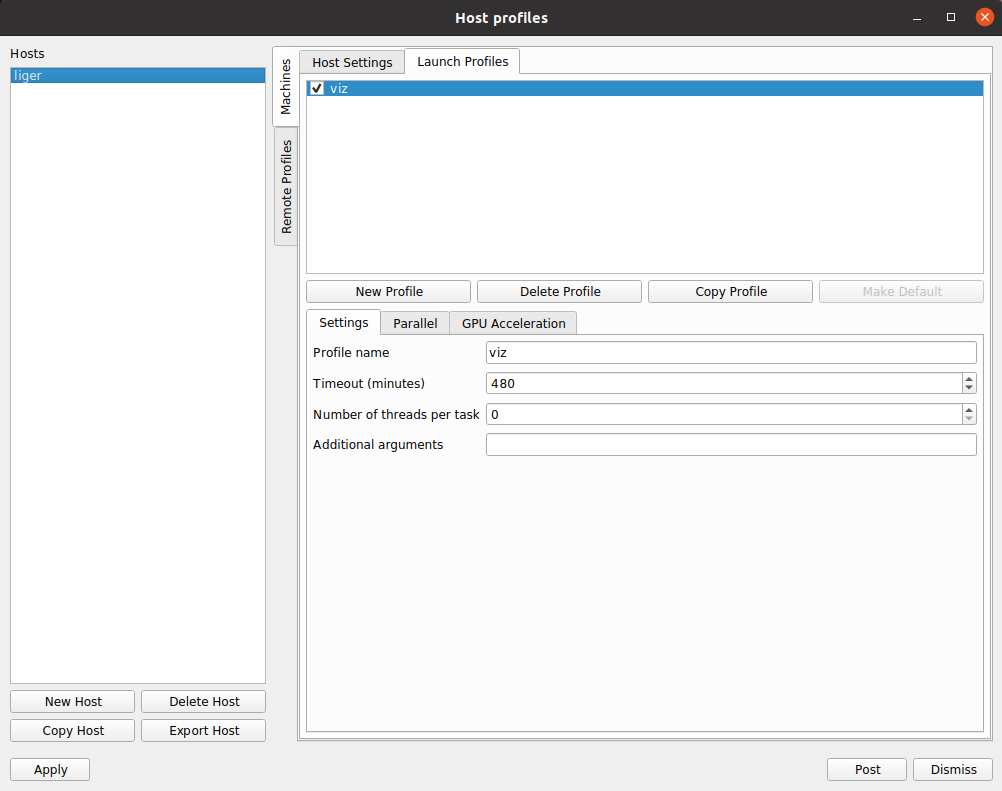
On the bottom view switch to the parallel tab and set the fields as follows:
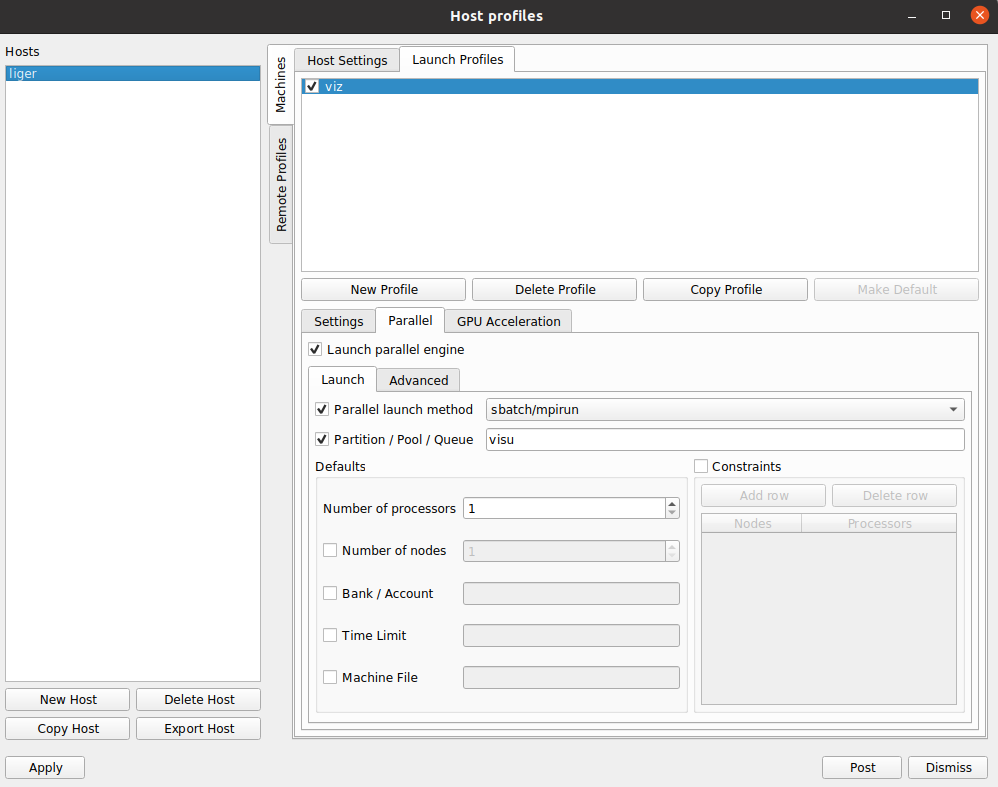
Click on Apply, close the window and make sure to click on Save settings under the Option menu. Without doing so, the remote host settings will disappear next time VisIt is booted.
Use the remote rendering profile#
When opening a file from VisIt, you will now be able to change Host (top dropdown menu) to liger. A password might be prompted to validate you connection (tip: add an SSH key lo Liger to avoid inserting the password each time).
If successful, your file manager will be redirected to your home space in Liger. You can now access all the files stored in Liger. An example is shown in the picture below.
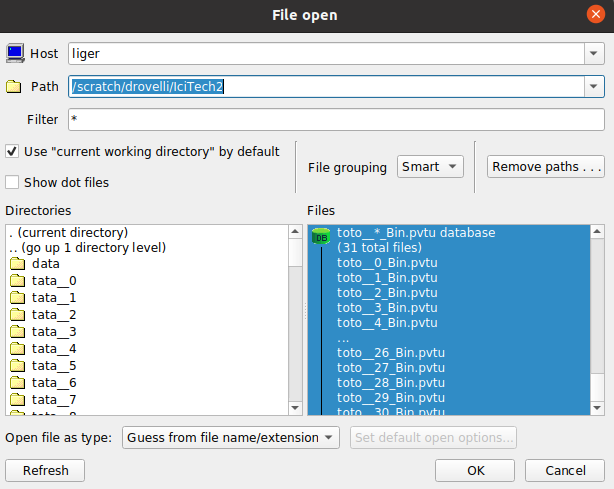
Choose the number of cores from 1 to a maximum of 24 cores. Once you click OK, the job will be sumbitted on a visualizaion (viz) node in liger, given it has enough available. In the case of no space, the job will be queued as usual. You can monitor the job by launching Mysqueue from Liger.
Remote rendering options#
Visit can employ 2 different ways of remote rendering. The correct setting of the rendering options can be crucial for the performance of the visualisation.
Go to Options -> Rendering -> (tab)Advanced, the default settings should look like this:
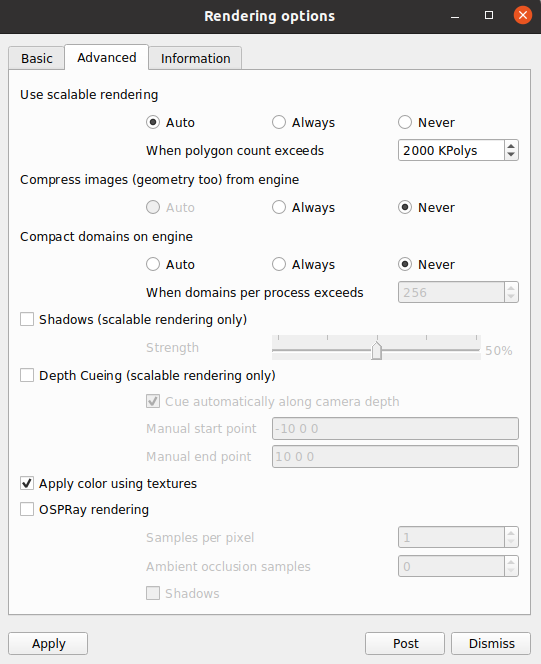
-
When the "scalable rendering" option is enabled, the server will process the image geometry + rendering and send only the lightweight image to the client. As a consequence, when we use the 3D viewer to rotate, zoom or any other transformation will lead to a client-server comunication that will cause some delay. This delay can be reduced by enbaling image compression (Compress image -> check the Always option). with a typical ADSL connection of 10 Mbps download, this delay is less than a second (roughly 2Mb exchange) plus the time that the Liger node takes to process the image, roughly a couple of seconds depending on its size.
-
When the "scalable rendering" option is NOT enabled, the entire image geometry (i.e. all the points in a mesh) will be sent to the local VisIt client. This settings enables a much smoother image manipulation since the image is rendered locally and there are no client-server exchanges during the process.
However, this option is unadvised for medium-large images: the entire geometry of the image could be large in size and take a very long time to be transferred to the client. The process can often crash during loading because of this. Moreover, your local machine might not have enough resources to process the image locally therefore leading to freezing and slow image transformations (single core + low memory processing).
The default option "Auto" will lead to scalable rendering only when the image exceeds 2M polygons. This limit is quite high and can often lead to the non-scalable rendering problem described in the second point.
It is suggested to lower the limit to 1000 Polygons and enable compression for best experience with medium-large images like in the image below:
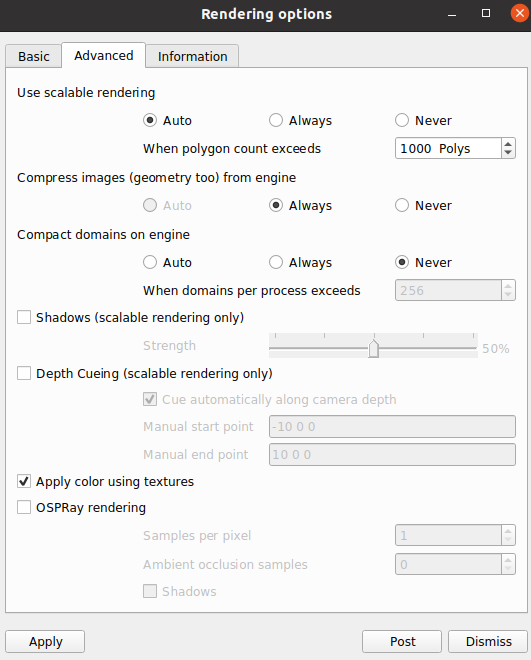
Summarizing: for small images it is best to use non-scalable rendering for smooth transformations directly on the client machine.
For larger images it is best to enable scalable rendering to keep the processing entirely on the server and avoid long waiting times or crashes at the cost of small pauses when manipulating the image.
The settings in the image above are a good tradeoff between the 2 cases, but the limit can be increased if you have a good network and/or powerful computer.
ParaView remote rendering on local client#
Similarly to VisIt, Paraview provides a client-server mode in which the computation, data processing and rendering is made on the remote server (Liger) and displayed on a local client instead of using the remote visualiser. This method can be quite convenient: the application will maintain its menus reactivity and graphics quality as a normal desktop program, while all the heavy image processing will be done in Liger. It can also result quite fast since only processed data (rather than the entire window) is passed from Liger to the client.
Compute (CPU) rendering#
Installing the local Client#
For this method you have to install Paraview version 5.11.0 on your computer. You can download the precompiled binary for your system on Paraview download page and selecting the correct operating system and version.
Running the server#
Log into liger
ssh user@liger.ec-nantes.fr
You can then copy the SLURM batch script located in /softs/liger/slurm/scripts/ParaView_Server_Template.sbatch to your home folder. Modify the values at the top of the batch script to fit the number of nodes and options to your liking, and launch it via SLURM to start pvserver. Here is the content of the template :
#!/bin/bash
#SBATCH --job-name=test_paraview_server
#SBATCH --ntasks=24
#SBATCH --time=00:30:00
#SBATCH --output=output_paraview_server_%j.log


# Example SBATCH file for starting ParaView CPU Server on LIGER
# Feel free to adapt the above SBATCH parameters.


# ----------- DO NOT TOUCH ------------------------------------
BATCH_HOST=$(hostname)
PARAVIEW_LISTEN_PORT=11111
LOCAL_PORT=9876
USERNAME=$(whoami)

echo "Starting ParaView Server on node ${BATCH_HOST}:${PARAVIEW_LISTEN_PORT}"
echo ""
echo "-> To connect to ParaView with your client, run the following command in your terminal (keep the terminal open) :       ssh -N -o ProxyCommand='ssh -W %h:%p ${USERNAME}@liger.ec-nantes.fr' -L ${LOCAL_PORT}:localhost:${PARAVIEW_LISTEN_PORT} ${USERNAME}@${BATCH_HOST}"
echo "Then connect to the server with your ParaView client using 'localhost' as the hostname and '${LOCAL_PORT}' as the port."
# -------------------------------------------------------------


/XF/App/Paraview-Server/5.11/Packages/ParaView-5.11.0-osmesa-MPI-Linux-Python3.9-x86_64/bin/mpiexec -np ${SLURM_NTASKS} /XF/App/Paraview-Server/5.11/Packages/ParaView-5.11.0-osmesa-MPI-Linux-Python3.9-x86_64/bin/pvserver --force-offscreen-rendering
When you run this batch script, wait a few seconds, and you should now see an output file in your current directory. Display the contents of the file to find the line "To connect to ParaView...". This line contains the SSH command used to forward data from the nodes to your local computer. From here on out, just think as if your local computer is now connected to the ParaView server running on the compute nodes.
You will need to enter your Liger password 2 times, this is completely normal.
DO NOT CLOSE THE TERMINAL RUNNING THE SSH COMMAND. DOING SO WILL TERMINATE THE CONNECTION TO THE SERVER AND THUS END THE SLURM JOB. KEEP THE TERMINAL OPENED DURING YOUR SESSION.
Client-server connection#
- Open Paraview 5.11.0 previously installed.
- Click on the connect icon
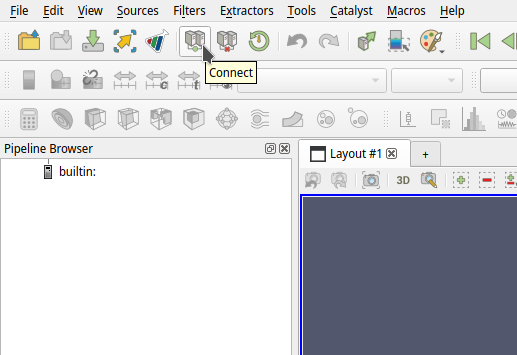
- Click on "Add server" and fill in with
localhostfor the host, and9876for the port (this can be changed in the batch script if you experience issues):
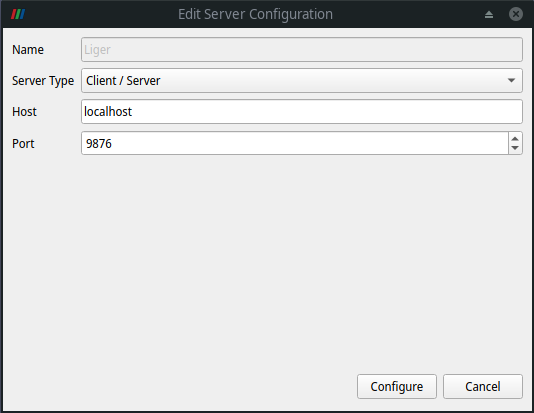
- Click on "Configure" -> "Save" -> "Connect"
- Wait for around a minute, the application will be blocked for this time. If the operating system asks you if you would like to terminate Paraview, click on "Wait".
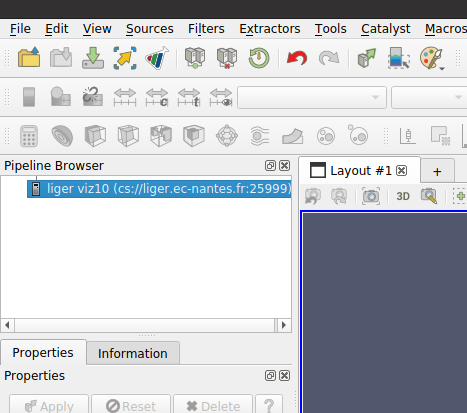
- Once you see that the little server icon under Pipeline Browser has changed from builtin: to Liger ... cs://localhost:9876 - you are ready to go!
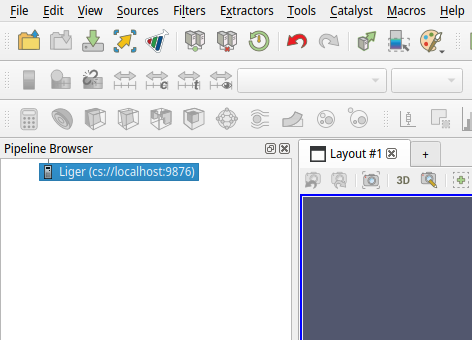
Viz (GPU) rendering#
Installing the local Client#
For this method you have to install Paraview version 5.10.0 on your computer. You can download the precompiled binary for your system on Paraview download page and selecting the correct operating system and version.
Running the server#
Log into liger
ssh user@liger.ec-nantes.fr
You can then submit (via Slurm) the Paraview script located in /softs/liger/slurm/scripts/pv_mpi.sl to launch pvserver directly on a visualization node.
sbatch -n12 /softs/liger/slurm/scripts/pv_mpi.sl
The -n12 flag specifies the number of CPU cores that the Paraview server will have access to. It corresponds to the number of MPI tasks
that the server will use: as the server is enables only for single-node computation the number of tasks should be between 1 and 24.
You might want to use more cores to:
- Have smoother interactions and faster rendering in large images
- Use more memory for large images: 1 core = +10.66 GB. It follows that a single job can have access to up to 256GB, using
-n24.
Once your job is submitted, check the output log in the file slurm.out in the current directory:
[drovelli@login02]$ cat slurm.out
running on host:
viz07

*connect client to liger.ec-nantes.fr:PORT where PORT depends on the host as below*
viz05 -> 25949
viz06 -> 25959
viz07 -> 25969
viz08 -> 25979
viz09 -> 25989
viz10 -> 25999
viz11 -> 26009
viz12 -> 26019
viz13 -> 26029
viz14 -> 26039

mpiexec -np 3 --rmk user --launcher ssh pvserver -p 5909
Waiting for client...
Connection URL: cs://viz07:5909
Accepting connection(s): viz07:5909
You can now use the information provided to connect to the server with the local client
Client-server connection#
- Open Paraview 5.10.0 previously installed.
- Click on the connect icon
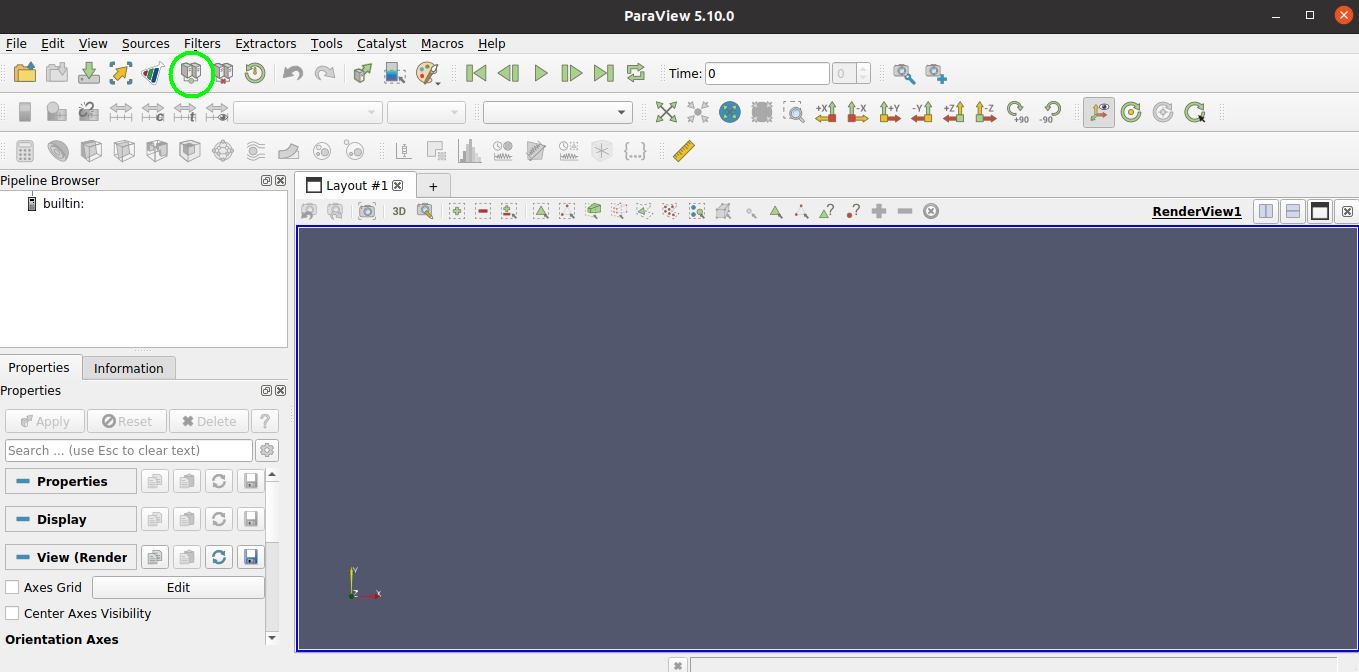
- Click on "Add server" and fill in with the settings given by the Slurm output log above. In this case, as the job was submitted on viz07:
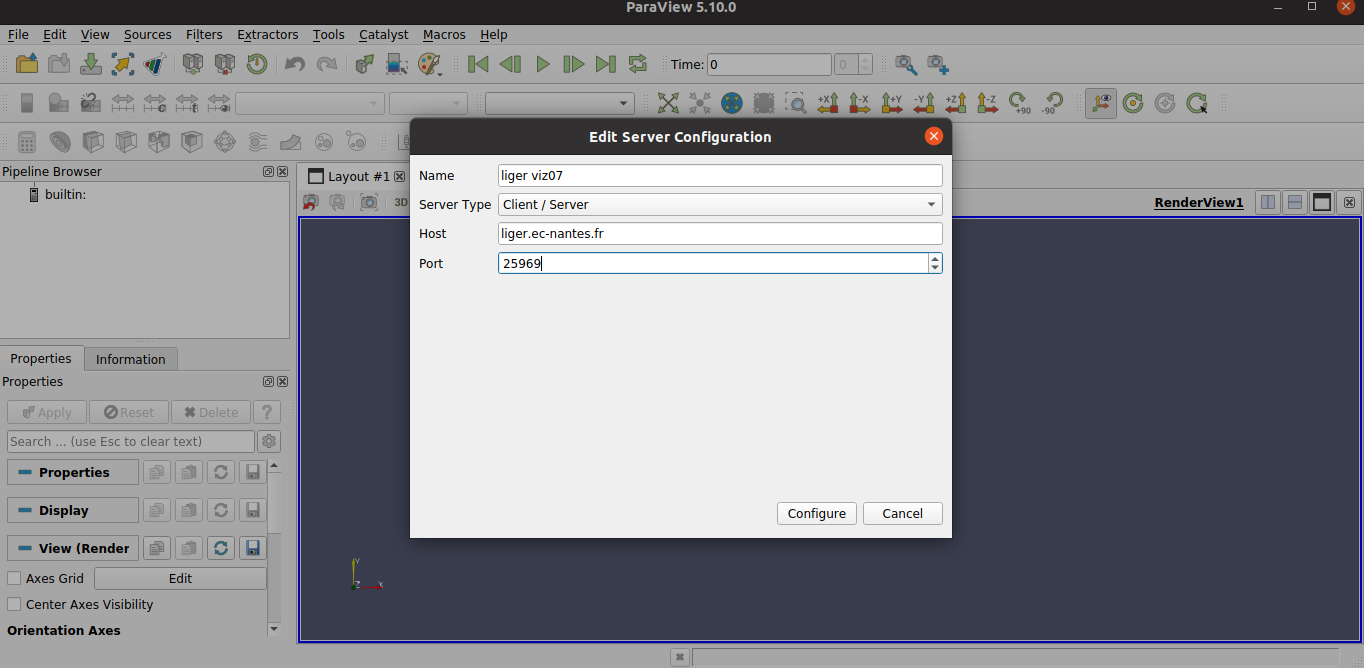
- Click on "Configure" -> "Save" -> "Connect"
- Wait for around a minute, the application will be blocked for this time. If the operating system asks you if you would like to terminate Paraview, click on "Wait".
- Once you see that the little server icon under Pipeline Browser has changed from builtin: to liger ... cs://liger.ec-nantes.fr:25xxx - you are ready to go!
